In today's environment of always-on, always-available Internet connectivity, network troubleshooting has become somewhat of a lost art. However, there are those of us still around who remember this was not always the case. Network troubleshooting was - and is - a crucial skill for both admins and developers and you may find it coming in handy when you least expect it. In this article, we'll explore network troubleshooting up and down the stack.
Let's start by talking a bit about the "stack", a.k.a. network "layers". In the late 90's, networking was far from the "set it and forget it" technology it has become. Several of the companies I worked for early in my career had dial-up Internet access primarily dedicated to email and Internet access on the desktop was a luxury, especially in smaller companies. However, you weren't missing much, as there wasn't that much corporate world-related content out there yet. When I got into IT in 1997, the certification game was at its peak, led by Microsoft, Novell (for you youngsters reading this, they're the company that Microsoft stole Active Directory from - https://en.wikipedia.org/wiki/Novell), and Cisco, and one thing common in all the certifications was the OSI Model and its layers:
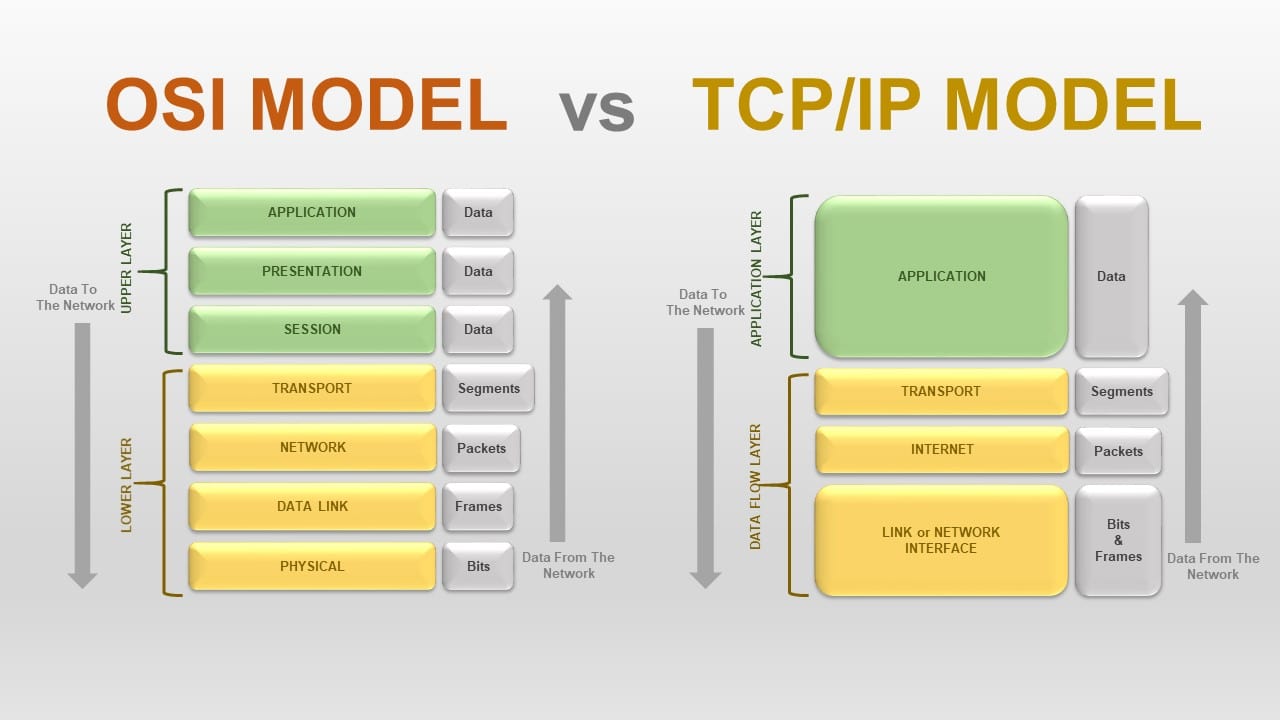
While the OSI model is still around, the TCP/IP model with its four layers instead of seven seems to be more relevant to today's environment so it's the model I'll be using for this article.
The four layers of the TCP/IP model are:
- Network Interface, a.k.a. Physical (encapsulating layers 1 and 2 of the OSI model)
- Internet (encapsulating all the "layer three" protocols and IP routing)
- Transport (TCP, UDP)
- Application (everything else)
While being more rare today than in the past, it's very useful to know how to identify the layers in which various technologies operate and to understand at a high level how data flows through the layers of the stack. Here's how it was explained to me:
- At the sending end, as application data is prepared to be sent over the network, a packet is created by adding headers as it moves down the stack, finally to the physical layer where transmission occurs (whether on a hard line, wireless, satellite etc.).
- At the receiving end, the packet makes its way up the stack and headers are discarded until the data contained within the packet is all that's left.
For instance, let's look at an TCP packet with its headers as an example:
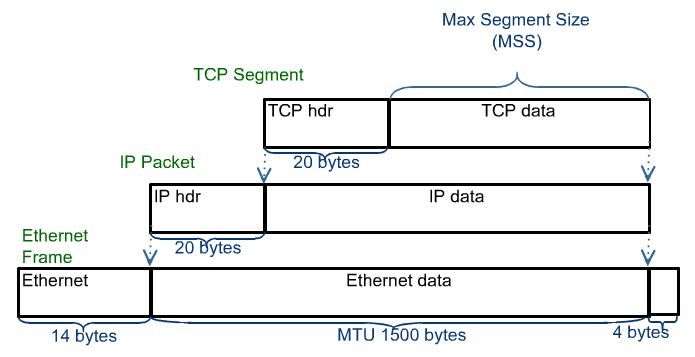
Without going further into detail, now that we have a basic understanding of the stack, we can talk about the tools available to troubleshoot problems at the corresponding layers. As we go, I'll point out the various tools you can use on both Windows and Linux operating systems.
Note: The following commands must be run in either an elevated command prompt/Powershell session in Windows or a root terminal in Linux.
Layer 1 - Network Interface
Here in the 21st century, we tend not to put too much thought into the physical layer because it's the layer we typically expect to "just work". However, as a solo admin, the physical network layer is in our jurisdiction, so we need to be familiar with it. Like most corporate offices, the majority of my users are connected to the network via Cat 5e. For the purposes of today's discussion, we'll assume that you've already tested the cable and determined there are no physical issues, so we need to check things at the network adapter in the computer. On Windows, open an elevated command prompt and run the command netstat -e:
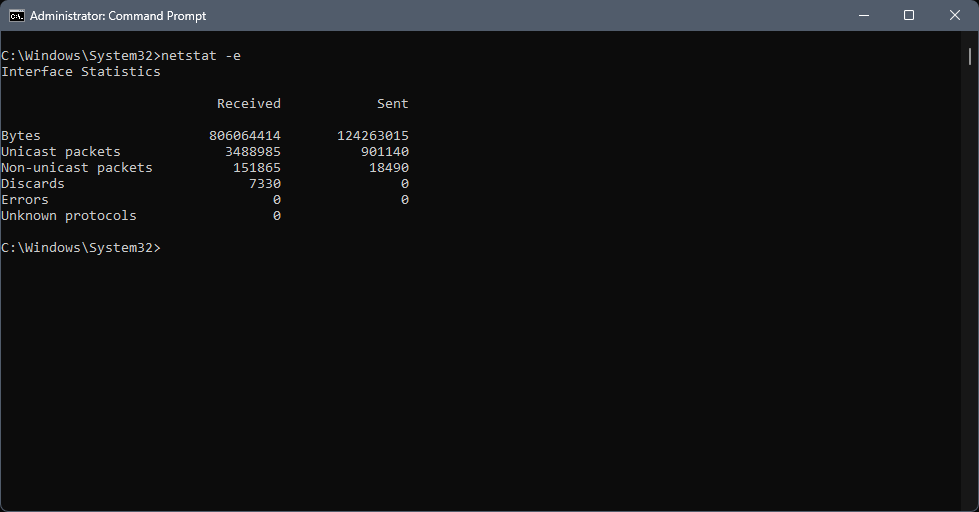
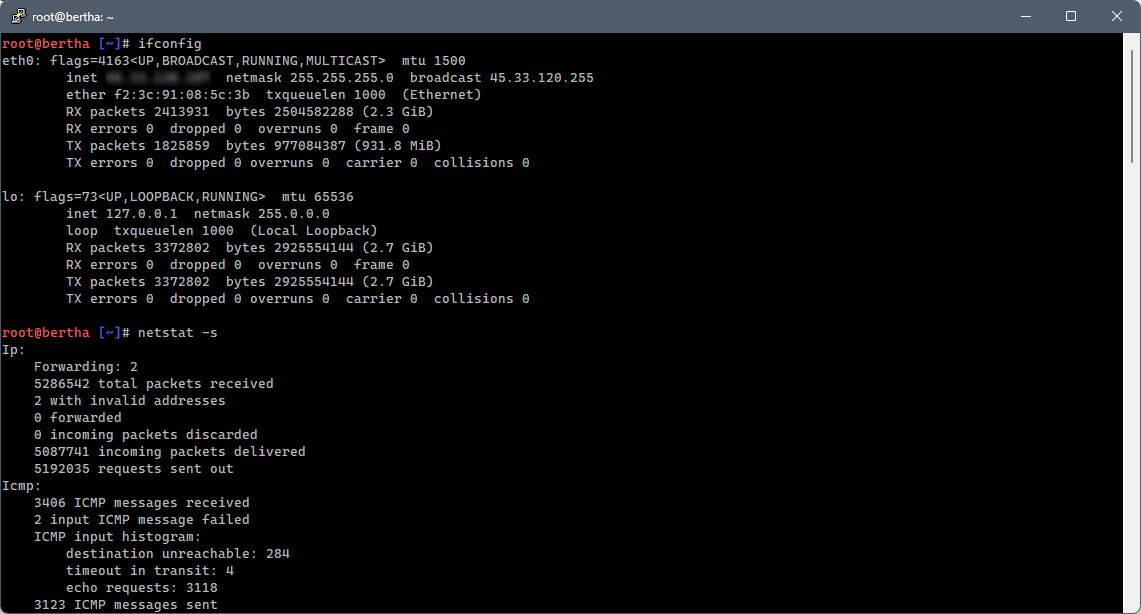
You're focusing on the "Errors" statistic; if this number is above zero, then you're experiencing physical layer issues. Over the years, I've seen physical layer errors manifest as timeouts, dropped packets, and other weirdness in the higher layers. If you're experiencing odd issues that seem to defy explanation, look for errors at the physical layer. On Linux you can get a quick overview with the command ifconfig and more detailed statistics with the command netstat -s:
With regard to wireless networking, on Windows, you can generate a (very) detailed wireless networking report by issuing the command netsh wlan show wlanreport:
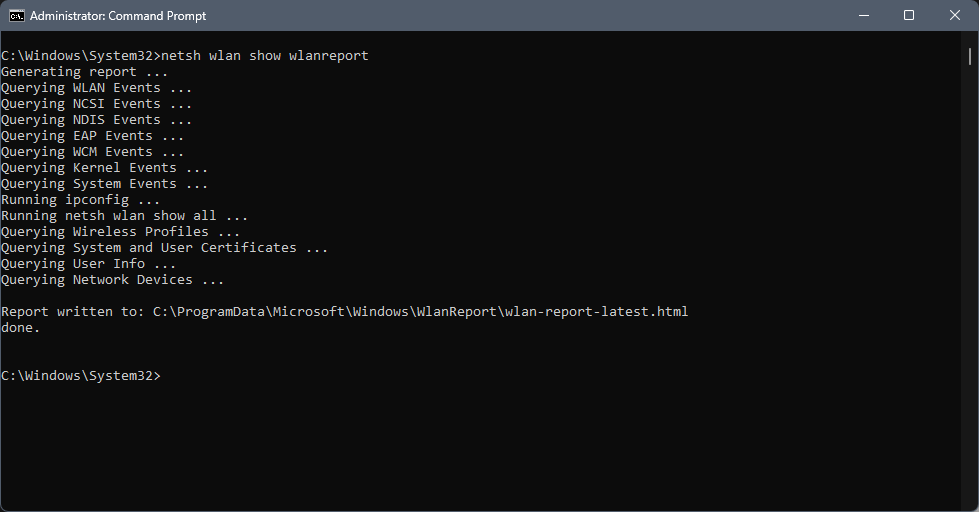
Although the WLAN report includes more than just the layer one statistics, it does provide a detailed view of them as well. On Linux, the command iwconfig provides a detailed overview of wireless status, including bit rate, link quality, etc.
Working our way up from the physical connection, but before we get to layer 2 and IP routing, we have the protocols that make up layer 2 of the OSI model or the "data link" layer. This layer can be problematic in a small network environment, especially if you're dealing with older hardware. It's also important to keep in mind the difference between a hub and a switch, both when troubleshooting and when purchasing new hardware. Unless you have some crazy reason I can't fathom, don't ever buy a hub. Come on people - it's the 21st century; don't use networking tech from the 90's! Some of the more common issues I've run into when troubleshooting layer 2 issues are:
- ARP caching on the switch (typical solution: reboot to clear the cache, or clear from within the management interface).
- Incorrect VLAN configuration; in general, VLAN's aren't needed in small networks. However, they can be useful for providing a degree of isolation within a single hardware device.
- Although technically a layer 1 issue, link speed and duplex configuration can be a BIG problem if not configured properly. For example, if you have auto-negotiation disabled on the switch and you're not properly configuring your link speed and duplex settings, you will generally experience horrible performance, sometimes manifesting as errors when running
netstat/ifconfig(previous section).
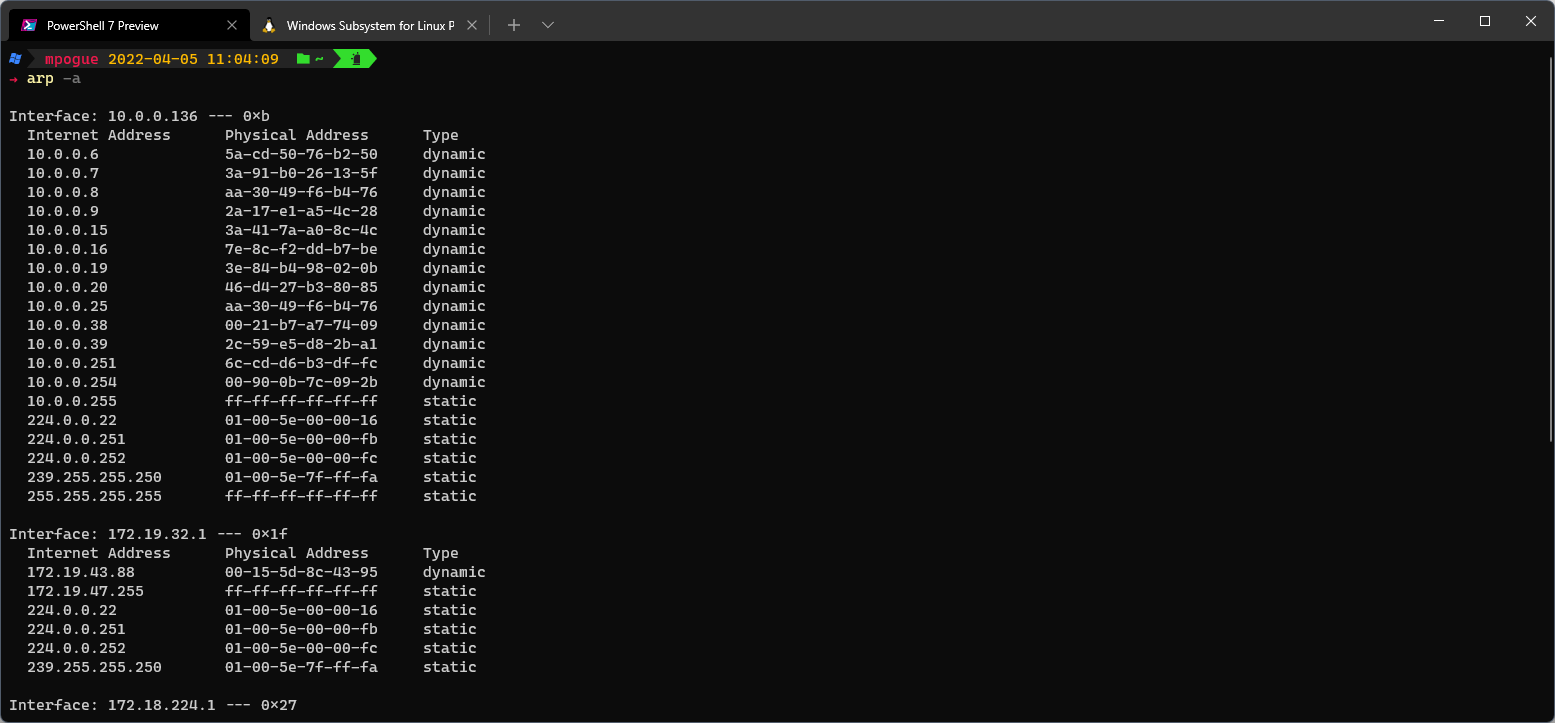
On both Windows and Linux you can view the local machine's ARP cache via the arp command:
Layer 2 - Internet
Most everyone reading this article has probably performed troubleshooting at layer two at some point, since this is the layer in which ping and friends operate, but hopefully you'll come away with some new techniques and/or tools after reading this section. As an admin, it's easy to overlook this layer when troubleshooting, but over the years, I've encountered a number of issues here. Note - in the OSI model, IP networking is considered layer 3 so if/when you hear someone talking about "layer 3", chances are they're talking about this layer.
Since almost everyone should be familiar with ping, I won't spend too much time on it. However, there are a number of ping enhancements and substitutions that are available that you should be aware of. On Windows, there are the Powershell Test-Connection and Test-NetConnection commands. These commands blur the line between layer 2 and layer 3 of the TCP/IP model, but they provide a number of useful options, especially Test-NetConnection. The Microsoft documentation reference for Test-NetConnection is here.
Also functioning at layer 2 of the TCP/IP model is IP routing. In a small network environment, you most likely won't be dealing with backbone routing protocols, however, a working knowledge of how routing works is crucial when troubleshooting. For instance, in my small network environment we have two satellite office locations connected through OpenVPN tunnels (creating two additional internal subnets that need to be routed properly), and remote users also connected via OpenVPN clients (creating a fourth internal subnet). In the network I just described, the subnets are assigned as follows (CIDR notation):
- 10.0.0.0/24 - HQ office LAN
- 10.0.1.0/24 - Remote Office #1
- 10.0.2.0/24 - Remote Office #2
- 10.0.254.0/24 - Remote VPN Users
Do I really need 254 addresses for each location? No, I don't. However, by using full class-C networks, I have plenty of room for growth and I don't have to do any subnetting math in my head (if you find yourself needing to do subnet math, my favorite IP subnet calculator website is here).
When troubleshooting routing issues, the old standby tool traceroute (tracert on Windows) is your friend; however, routing is one of those things that as a solo admin, you'll rarely have to deal with. Unless you're a sadist, you'll want to handle all routing at the firewall, assign your hosts a default gateway, and call it a day. For instance, let's look at the output from a trace from my local machine to one of the remote subnet hosts (10.0.1.254):
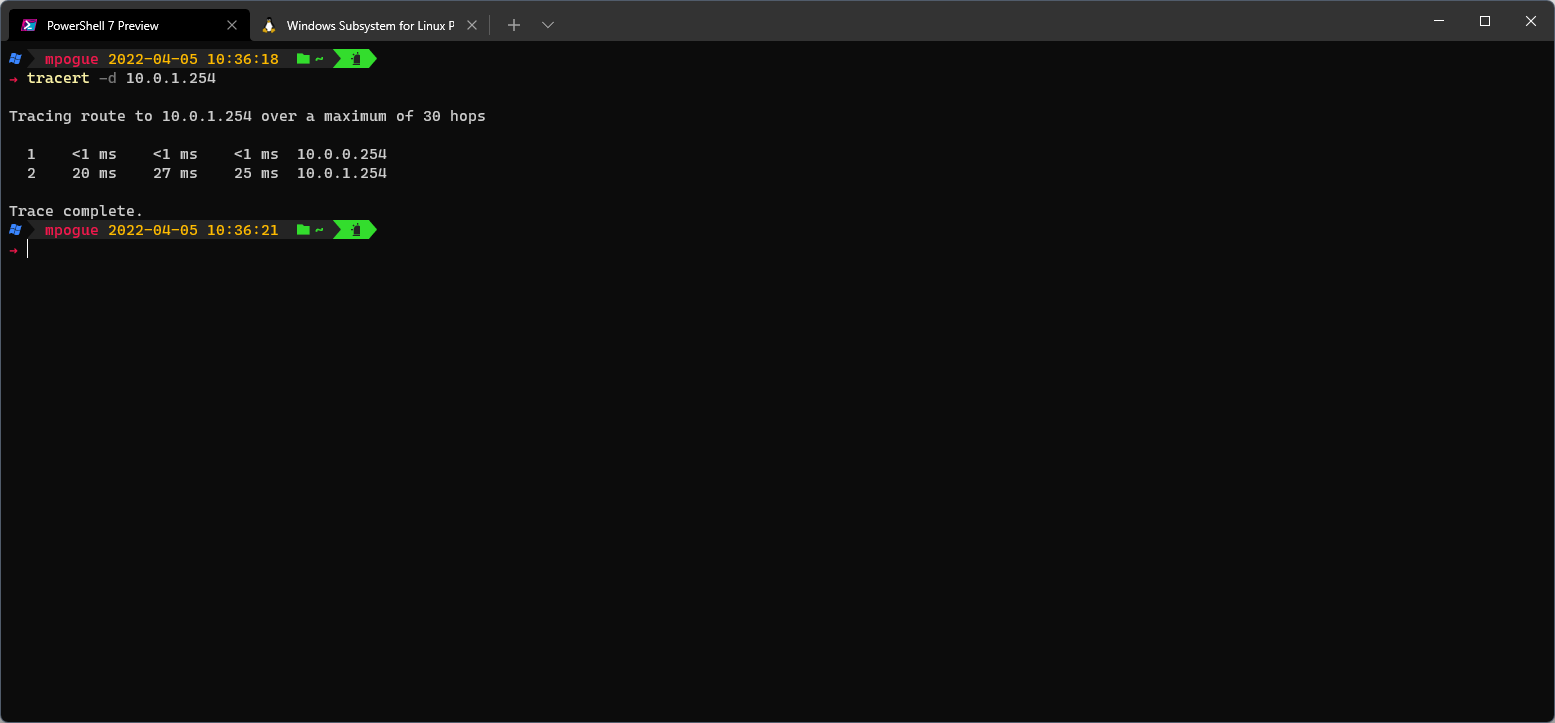
Not very exciting - I go through my default gateway (the firewall), through the VPN tunnel and out the other side. As far as routing is concerned, my advice is to keep it simple - your Internet gateway will be the default route for your firewalls and if your VPN tunnels are configured correctly, the firewalls will handle the VPN routes for you. However, knowing how routing functions can come in very handy when troubleshooting these types of issues; the guru99.com website has a primer on IP routing here that I would strongly recommend if you're not familiar with all the concepts. I might cover routing loops, TTL, and other vagaries of routing in a separate post (or email me if you have questions).
Layer 3 - Transport
The Transport layer is generally consistent in both the OSI model (as layer 4) and the TCP/IP model and contains transport protocols, the most common of which are TCP and UDP. From layer 4 up, both the protocols and the troubleshooting techniques are more complex.
Examining TCP vs. UDP, it's handy to know the difference between the two in terms of function and general usage. The howtogeek.com website has a very nice writeup of the differences between TCP and UDP. It's at this point that we will begin to rely on full blown applications such as Wireshark and Nmap to assist us with troubleshooting. (As an aside, one of my favorite general IT interview questions asks the candidate to describe the TCP three-way handshake, e.g. SYN -> SYN/ACK -> ACK).
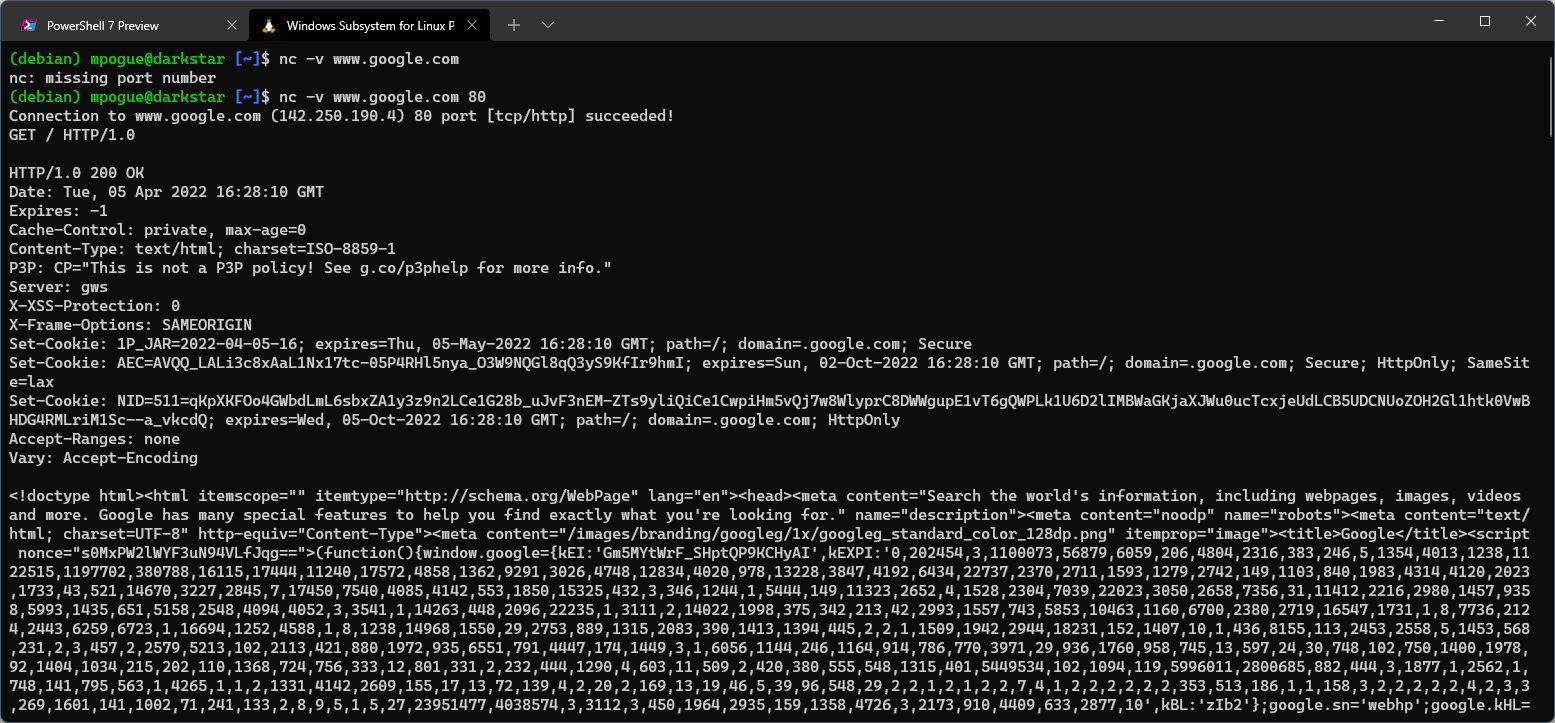
One of my go-to commands on Linux is the netcat command, alias nc. The nc command is ideal for determining whether a TCP port is open and can send and receive data. For example, we can determine if www.google.com is responding by issuing the command nc -v www.google.com 80. If we receive a successful connection message, we can send the request GET / HTTP/1.0 to request a copy of the root (home) page and we should receive a response back:
Detailed usage of programs like Wireshark and Nmap could fill multiple posts so I'll leave that for another time, but any admin worth his or her salt will take the time to learn how to use both of these programs. They will both serve you well in your day-to-day troubleshooting and have helped me solve many problems over the years.
Layer 4 - Application
Finally we get to the top - layer 4, a.k.a. the Application layer (layers 5, 6, and 7 of the OSI model - Session, Presentation, and Application respectively). This is where all of our upper level protocols - DNS, HTTP/S, SMTP, SMB, NFS, etc. - reside. Since I could write a series of posts on any one of these protocols, I'll illustrate two examples that I use very frequently.
First up, in reference to this post's title, sometimes DNS is the problem, in which case the dig command (part of the bind9-dnsutils package on Debian, downloadable on Windows - instructions here) is THE tool for the job. For example, if we wanted to view all the DNS TXT records for thesoloadmin.com domain, we could do it easily via the command dig thesoloadmin.com txt:
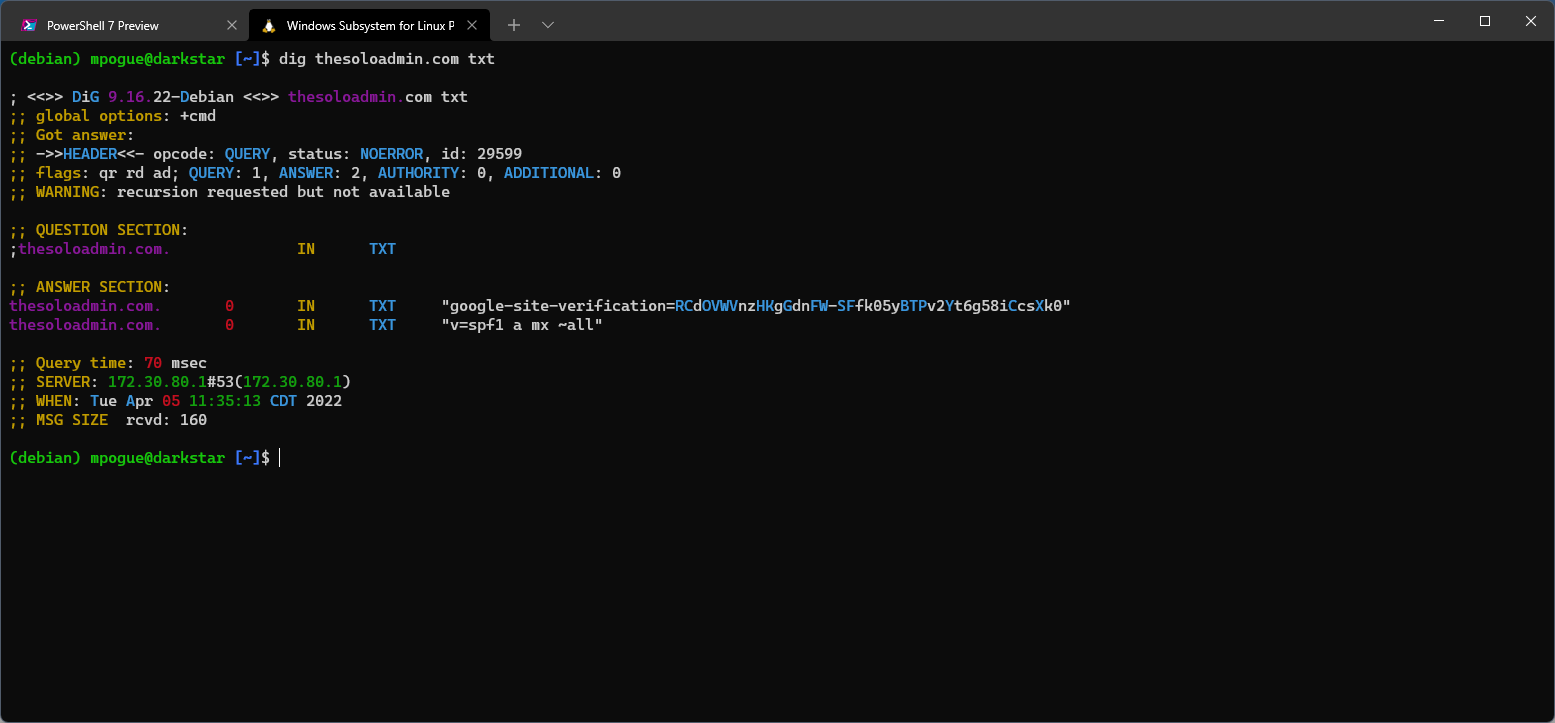
Julia Evans has a very nice dig tutorial on her blog here. I use dig all the time, especially when I'm adding/updating DNS records to ensure that propagation has completed. I also use it internally to troubleshoot a variety of Active Directory issues, as AD is intimately linked with DNS.
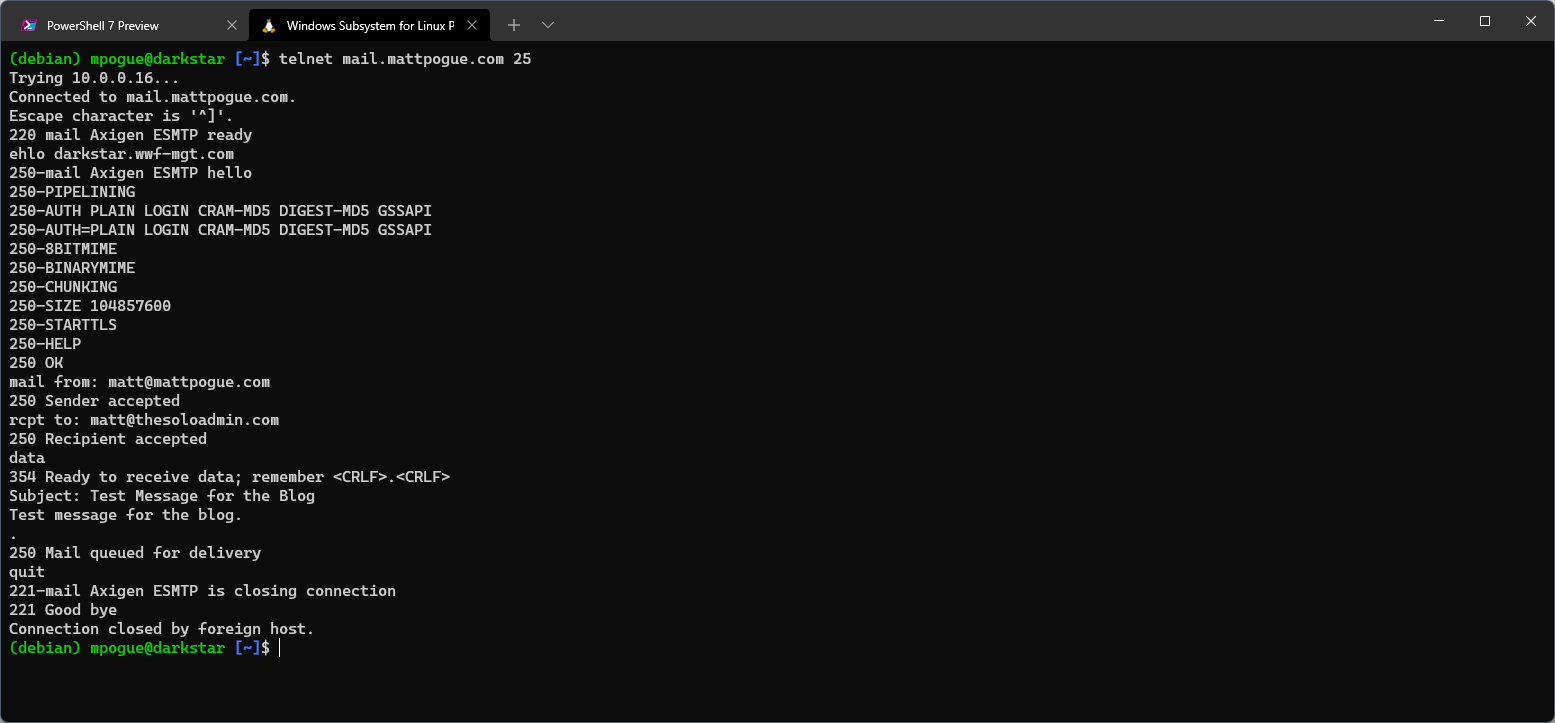
Finally, I'm going to walk through the steps used to send an email via telnet. I've used this particular example probably as much as anything else in this article over the years (with the exception, obviously, of ping). When troubleshooting mail delivery, this is a handy sequence of commands to know. We'll keep it very basic and assume that we're testing against an internal server and our IP address is allowed to connect and send mail. The sequence is as follows:
telnet mail.thesoloadmin.com 25- Initiate a connection to the mail server on port TCP/25.ehlo your.hostname.com- Issue the EHLO command to identify the connecting host. The server will respond with a list of capabilities.mail from: <sender address>- The "mail from:" command begins the sequence to send a message. The server will respond with250 Sender accepted, an error indicating that authorization is required, or possibly another message.rcpt to: <recipient address>- The "rcpt to:" command defines the recipient. Again, the server will respond with either a successful message, an error indicating that relaying is denied, or possibly another message.data- If the previous commands have all been successful, the "data" command indicates that the following lines will contain the message data. As shown in the screenshot below, the SMTP protocol remains very basic - enter "Subject:" to set the subject line of the message, press enter, and then begin typing the message body. After completing the message body, go to a new line and enter a single "." followed by another carriage return. The single period signifies the end of the message data.
Having obtained both the Cisco CCNA and SANS GCFW certifications early in my career provided me with a solid foundation in both networking and firewalls and imparted a lot of skills that I still use on a regular basis. Whether you're a solo admin running your own small network environment, a developer spinning up and managing containers, or a server admin working with VM's, network troubleshooting is a critical skill that you'll probably use more often than you realize.
If you have questions or comments about any of the topics in this post, feel free to email me - matt@thesoloadmin.com.

